搜索到
3
篇与
Spring boot
的结果
-
 Server Send Events With Spring Boot 背景在使用ChatGPT时,通过http.Post进行调用耗时非常高,体验较差。 OpenAI提供了Stream(即SSE)的返回模式,不用等到响应生成完后才给到客户端响应。使用Stream API方式时,那么后端与前端也需要使用SSE的方式进行API交互。源代码在文末。Server-Sent Events(SSE)是一种在Web浏览器和服务器之间实现服务器推送事件的技术。它允许服务器向客户端推送事件流,这些事件可以是简单的文本消息或具有自定义格式的复杂数据。SSE 是一种基于 HTTP 的协议,使用长轮询或 HTTP 流来实现服务器推送。 SSE 可以用于各种用例,例如实时更新股票报价、即时聊天应用程序、新闻或社交媒体网站上的实时更新等等。与传统的轮询或 WebSocket 不同,SSE 不需要客户端发起请求,而是服务器始终保持连接打开并推送数据,因此 SSE 可以更高效地使用网络带宽和服务器资源。 在前端,可以使用 JavaScript API 来监听服务器发送的事件,以及处理和显示这些事件的数据。 引用:## open ai chat api https://platform.openai.com/docs/api-reference/chat/create ## Request ChatGPT API Using Spring boot https://www.taogenjia.com/2023/03/16/The-Guide-to-Call-ChatGPT-3-5-Event-Stream-API-in-Spring-Boot/ ## Doc https://developer.mozilla.org/en-US/docs/web/api/server-sent_events/using_server-sent_events https://developer.mozilla.org/zh-CN/docs/Web/API/EventSource ## nginx https://nginx.org/en/docs/http/ngx_http_proxy_module.html#proxy_buffering理解常见的HTTP请求是服务端把命令执行完成过后给到一个结果,那么客户端必须等待,大部分场景下这是没问题的。 那么在处理时间比较高的场景下,客户端可以实时接收部分处理结果,增加用户体验。我们从另一个角度看Http,HttpServerRequest: 有输入流,包含请求的数据HttpServletResponse:有输出流,可以写响应数据。那么我们处理Http请求时,不断的向Response的 outputStream写入数据,那么在没有处理完成响应的情况下也可以收到一部分数据。 @GetMapping("test") public void test(HttpServletRequest request, HttpServletResponse response) throws Exception { // 设置响应的Content-Type为text/event-stream response.setContentType("text/event-stream"); response.setStatus(200); OutputStream outputStream = response.getOutputStream(); int i = 10; while (i >= 0) { String message = "i : " + i + "\n"; outputStream.write(message.getBytes(StandardCharsets.UTF_8)); outputStream.flush(); try { Thread.sleep(1000); } catch (Exception ignored) {} i--; } }我们打开浏览器访问这个api时,界面会间隔一秒输出一行:i : 10 i : 9 i : 8 i : 7 i : 6 i : 5 i : 4 i : 3 i : 2 i : 1 i : 0点击查看效果有了以上理解,我们只需要按着SSE要求的格式不停的向写入数据即可。SSE 格式1、id event dataid: xxx \n event: message \n data: hello from cc\n\n2、event dataevent: message \n data: hello from cc\n\n3、data onlydata: hello from cc\n\n其中: event: 事件名称,可以自己定义,默认是message id、event: 可选4、结束推送 如果使用sse,需要服务端进行关闭,如果不关闭前端会不停的重试(retry)自定义事件event: close \n data:\n\n前端订阅然后close,然后关闭sse const sse = new EventSource('/api/sse'); /* * 自定义订阅 */ sse.addEventListener("close", function(e) { sse.close(); }) /* This will listen only for events * similar to the following: * * event: notice * data: useful data * id: someid * */ sse.addEventListener("notice", function(e) { console.log(e.data) }) /* Similarly, this will listen for events * with the field `event: update` */ sse.addEventListener("update", function(e) { console.log(e.data) }) /* The event "message" is a special case, as it * will capture events without an event field * as well as events that have the specific type * `event: message` It will not trigger on any * other event type. */ sse.addEventListener("message", function(e) { console.log(e.data) })发送特殊标记的datadata: [DONE]\n\n处理 '[DONE]'的message const sse = new EventSource('/api/sse'); /* The event "message" is a special case, as it * will capture events without an event field * as well as events that have the specific type * `event: message` It will not trigger on any * other event type. */ sse.addEventListener("message", function(e) { var data = e.data; if (data.contains('[DONE]')) { sse.close() } else { console.log(data) } })踩坑1、使用Nginx部署后,消息没有一个一个收到,而是在处理完成后整个返回修改 nginxlocation / { proxy_pass http://127.0.0.1:xxx/; ... # When buffering is disabled, the response is passed to a client synchronously, immediately as # it is received. nginx will not try to read the whole response from the proxied server. The # maximum size of the data that nginx can receive from the server at a time is set by the # proxy_buffer_size directive. proxy_buffering off; ... }2、如果使用了WebFiler,需要开启asyncSupported @WebFilter(urlPatterns = "*",asyncSupported = true) public class SomeFilter implements Filter { .... }源代码https://gitee.com/pchenc/sse-demo
 -
我是怎么样优化API的? 背景在系统开发过程中,以迭代功能为主,在使用过程中遇到性能瓶颈再进行针对性优化。本次遇到的问题是在导入3000+FAQ时导入时间大概500S左右,用户端提示导入失败,结果数据在导入中。文章出现的代码经过处理,不包含任何具体隐私信息,仅还原场景概念:FAQ:一般指常见问题解答。常见问题解答(frequently-asked questions,简称FAQ)即:一个问题对应一个答案。他的结构大概是一组相关的问题和一个答案。比如“你是谁?”这个问题,他会有不同的问法:“你叫什么?你叫啥?”,然后对应一个答案:"我是xxx"意图/Intent:即FAQ中的“你是谁”目标1、在3000条数据时,导入在时间优到5秒内(而用户能够忍受的最长等待时间在6~8秒之间);2、优化查询,返回时间在1S内;步骤1、找出瓶颈点;2、确定优化措施;3、实施;这三个步骤看似简单,其实需要在开发过程中逐步积累出自己的套路及经验。FAQ批量导入这里从系统csv文件中读取出意图和答案,再将数据保存到数据库,然后做一些检查,把错误的信息打上标签。解析数据保存校验、更新找出瓶颈点首先,我们发现API慢时,我们要知道哪些步骤慢。 这里我们用到google的Stopwatch进行“打桩”,给个操作计时。如 public static void main(String[] args) { // 创建后可多次输出耗时 Stopwatch stopwatch = Stopwatch.createStarted(); ThreadUtil.sleep(1000); System.out.println("消耗时间:" + stopwatch.elapsed(TimeUnit.MILLISECONDS)); ThreadUtil.sleep(2000); System.out.println("消耗时间:" + stopwatch.elapsed(TimeUnit.MILLISECONDS)); } 消耗时间:1001 消耗时间:3009回到我们的导入FAQ代码 public void save(String faqId, MultipartFile file) throws Exception { Stopwatch stopwatch = Stopwatch.createStarted(); // 1、从faq文件解析出数据 List<List<String>> rows = _readRows(file); LOG.info("[import faq - finish check used:]", stopwatch.elapsed(TimeUnit.MILLISECONDS)); // 获取一个链接 Connection conn = getConn(); // 一个FAQ由一个User、一个Bot组成 // 转换成faq pair 对 List<Pair<User, Bot>> details = _convertRows(rows, faqId); LOG.info("[import faq - convert: ]", stopwatch.elapsed(TimeUnit.MILLISECONDS)); // 保存到数据库 for (Pair<User, Bot> p : details) { ComponentDao.add(conn, p.getKey().toComponent()); ComponentDao.add(conn, p.getRight().toComponent()); } LOG.info("[import faq - save 2 db: ]", stopwatch.elapsed(TimeUnit.MILLISECONDS)); conn.commit(); LOG.info("[import faq - finish commit 2: ]", stopwatch.elapsed(TimeUnit.MILLISECONDS)); _validate(faqId, conn); conn.commit(); } private void _validate(String faqId, Connection conn, String dbName) throws Exception { Stopwatch stopwatch = Stopwatch.createStarted(); // 1、创建一个上下文,携带一些信息 ComponentValidatorContext context = _buildContext(componentId, conn); LOG.debug("[validate faq - build context:{}]", stopwatch.elapsed(TimeUnit.MILLISECONDS)); // 2、 query 当前节点所在的validator,将user、bot转换成校验器 Pair<ComponentValidator /*Faq Validator*/, List<ComponentValidator>/*children validators*/> validatorPair = _validators(context); LOG.debug("[validate faq - build validate pair:{}]", stopwatch.elapsed(TimeUnit.MILLISECONDS)); // 3、遍历节点,更新错误信息 LOG.debug("[validate faq - start validate with length:{}, spend:{}]", validators.size(), stopwatch.elapsed(TimeUnit.MILLISECONDS)); int writeDbCount = 0; boolean hasError = false; for (ComponentValidator validator : validators) { StatusCodes statusCodes = validator.validate(context); if (statusCodes != null) { hasError = true; } // 节点错误 boolean updated = updateComponentError(validator); if (updated) { ComponentDao.update(conn, validator.getComponent()); writeDbCount++; } } LOG.debug("[validate faq - finish validate with write 2 db count:{}, spend:{}]", writeDbCount, stopwatch.elapsed(TimeUnit.MILLISECONDS)); // 3、更新FAQ上的标记 _updateError(faqId, hasError); LOG.debug("[validate used in millis:{}]", stopwatch.elapsed(TimeUnit.MILLISECONDS)); }运行结果[import faq - finish check used:147] [import faq - convert:241] [import faq - finish save 2 db:50870] [import faq - finish commit:50878] [start validate] [validate faq - build context:33486] [validate faq - build validate pair:35203] [validate faq - start validate with length:6795, spend:35203] [validate faq - finish validate with write 2 db count:6795, spend:361809] [validate used in millis:361818]到此,我们可以从打桩信息中得出瓶颈:保存到数据库,花费50s+构建上下文:33s+检验所有节点:326s+确定优化措施1、保存到数据库,花费50s+代码: // 保存到数据库 for (Pair<User, Bot> p : details) { ComponentDao.add(conn, p.getKey().toComponent()); ComponentDao.add(conn, p.getRight().toComponent()); }这里有3397个FAQ,6794个User、Bot节点;那么就执行6794次save操作。方案:结合以往经验,这里我们做批量保存。减少db写入次数, 批量写入;mysql批量写入优化;1、改为批量写入 : 写入db次数变成了 14次private void _saveBach(List<Pair<RestProjectComponentUser, RestProjectComponentBot>> data, Connection conn, String dbName)throws SQLException { String sql = "INSERT INTO tableName (id, xx, xx) VALUES (?, ?, ?) "; PreparedStatement ps = conn.prepareStatement(sql); for (int i = 0; i < data.size(); i++) { Pair<User, Bot> item = data.get(i); Component user = item.getKey().toComponent(); Component bot = item.getValue().toComponent(); _add2Bach(ps, user); _add2Bach(ps, bot); // 每500次提交一下 if (i % 500 == 0) { ps.executeBatch(); conn.commit(); ps.clearBatch(); } } ps.executeBatch(); conn.commit(); ps.clearBatch(); } private void _add2Bach(PreparedStatement ps, Component component) throws SQLException{ ps.setString(1, component.getId()); ps.setString(2, component.getXX()); ps.setString(3, component.getXx()); ps.addBatch(); } 2、mysql批量写入优化修改链接信息,重写批量写入jdbc:mysql://127.0.0.1:3305?rewriteBatchedStatements=true验证## 时间从50S+到1s+ [import faq - finish save 2 db:1586]总结: 这里原来每次保存都要写入数据库,大的数据量下这效率必然是低下的。经过批量保存和重写批量insert的sql,这减少了写入db次数,提高了sql批量写入效率# 之前:6794次insert insert into xx (xx,xx) values (xx,xx) # 之后:14次批量insert INSERT INTO xx (xx,xx) values ('xxx','xxx'),('xxx','xxx')...2、构建上下文:33s+针对构建上下文,我们在再次打桩,查找瓶颈点[build - context start build validate context] [build - convert2Rest - start] [build - convert2Rest - find root & query all projects spend:652] [build - convert2Rest - load children:10113] [build - convert2Rest - covert children:22067] [build - build - context convert2Rest pair spend:22072] [build - build - context spend:32382]这里大概的逻辑:查询顶级节点、查询当前项目下所有的节点信息还原关联关系从db对象转换成Rest对象筛选一些节点优化的点多次查询当前项目的所有节点-这数据量大,多次重复操作这在只查询一次,其他方法用到所有节点时通过参数传入还原关联关系这用了递归,实现简单数据量大时效率不如 while /for 循环 -- 改为while + for从db对象转换成Rest对象-在循环中查询整个项目数据减少重复查询db循环中使用stream,筛选/转换少量 - 这种场景下效率不如for筛选一些节点减少db查询递归转while /for验证[build - context start build validate context] [build - convert2Rest - start] [build - convert2Rest - find root & query all projects spend:3] [build - convert2Rest - load children:15] [build - convert2Rest - covert children:124] [build - context convert2Rest pair spend:128] [build - context spend:214]总结:减少db查询合理使用stream递归转while / for实现这优化还是很明显,从32S+到0.2S。3、检验所有节点:326s+这是最耗时的地方,先分析下代码:for循环所有节点,执行校验逻辑 - 验证意图(Intent,用户节点的输入需要唯一)不能重复如果有错误,将错误信息更新并同步数据库finish validate with write 2 db count:6795, spend:361809这提示总共写了6795次db,这显然不合理,因为在测试的时候是全新的数据,不会重复。 int writeDbCount = 0; boolean hasError = false; for (ComponentValidator validator : validators) { StatusCodes statusCodes = validator.validate(context); if (statusCodes != null) { hasError = true; } // 节点错误 boolean updated = updateComponentError(validator); if (updated) { ComponentDao.update(conn, validator.getComponent()); writeDbCount++; } }这里结合上面的套路优化stream修复更新db的bugfinish validate with write 2 db count:0, spend:108427 这总时间从361s+到108s+,提升非常大。剩余的代码检查没有操作db,但仍然有如此高的耗时,这很不合理。那么108427 / 6794 约等于16毫秒,校验一个节点需要这么久,显然不正常。我们再次使用Stopwatch打点状,输出下校验的耗时 for (ComponentValidator validator : validators) { Stopwatch sw = Stopwatch.createStarted(); StatusCodes statusCodes = validator.validate(context); if (statusCodes != null) { hasError = true; } long usedInMillis = sw.elapsed(TimeUnit.MILLISECONDS); if (usedInMillis > 20) { LOG.debug("[validate usedInMillis:{}]", usedInMillis) } .... }... [validate component usedInMillis:199] ...这就发现了问题,部分节点耗时异常的高。排查后发现这些节点的intent数量很大,intent越大越耗时。 // 经过排查发现, 在校验User.Intent时会判断是否与数据库已存在的意图重复。 // 那么这里有很大的计算量: // 这样判断扩展问重复从 example.size * db.example.size private boolean intentRepeated() { List<String> exampleTexts = getIntents(); //user的example不能重复,如果是引用的摸板则允许重复 List<User> users = componets.stream() // filter .collect(Collectors.toList()); for (User item : users) { List<String> examples =item.getIntents(); for (String text : examples) { if (exampleTexts.contains(text)) { return true; } } } return false; } 我们来看看这里的问题:循环中有stream, 这部分在筛选db中的User这里所有节点都是一样的,不用每次都计算,将结果在context中缓存起来,只计算一次,后续直接用for * for计算量大修改实现1、User从context获取,不在这进行计算 - 计算次数减少了6000次+ List<User> users= null; public List<User> getUsers() { if (users == null) { synchronized (this) { if (users == null) { users = componets.stream() // ... filter .collect(Collectors.toList()); } } } return users; }2、减少计算次数这里需要一定的经验积累,比如在第二个for循环中,我们改成map.containsKey去判断,就去掉了一个for循环。Tip:在最好的情况下,map.containsKey(key)的时间复杂度时o(1)Context中构建db中存在的Intents,只在第一次用到时计算,其他后续节点直接使用即可; private boolean intentRepeated() { List<String> exampleTexts = getIntents(); Map<String> exitsIntents = context.intentsMap(); for (String text : examples) { if (exitsIntents.containsKey(text)) { return true; } } return false; }这样以来,我们的计算量变:从 example.size db.example.size 变成 example.size 1 次;验证:[start validate with length:6795] [finish validate with write 2 db count:0, spend:227]总结:合理使用stream缓存结果,减少计算次数减少计算次数结论至此,完成了本次优化,同样数据导入时间控制在了5s左右。减少db读写次数、批量操作;合理使用stream,在循环且单个集合数量较小的情况下,使用循环;合理使用递归修复Bug合适使用Context,将结果缓存,减少重复计算减少计算量经过此次调整,其中重要的是如何发现问题,解决方案可以有很多。同时要知道调整后,多少是符合预期的,不能盯着小的优化点去弄,这种优化空间太低了,反而会花很多时间效果也不会好。如何找到瓶颈点预期优化效果在开发过程中,我们还是以满足实现为主,在时间可能的情况下合理保证代码效率,可以在后续碰到瓶颈时单独处理即可。打个广告:如果你是RASA开发者: PromptAI支持通过脑图的方式编辑对话流程,编辑完成后可一键下载Rasa Project文件,可在原生Rasa直接训练[部分高级功能需要配合应用使用] - 功能: FAQ、多轮、变量提取(单个/多个)、form、webhook及自定义Action等高级功能; - 编辑: 支持拖拽、回收站、收藏、撤销、重做及复制等便捷功能; - 调试: 编辑完成后可一键调试、发布,最大程度减少开发时间。我们提供高性能GPU(3090),让你的效率起飞! - 其他: 支持私有部署,如果你有需求可联系我们! 如果你是普通用户,不会开发,但是想用AI对话: PromptAI对普通用户/企业极度友好,无需了解编程/AI的相关知识,也可快速上手,比Excel使用还简单,没有复杂繁琐的操作及公式! 几分钟就能拥有自己的ChatBot! 免费使用:https://www.promptai.cn 注册过程:免费试用 -> 填写试用信息 -> 审核通过 -> 即可上手!
-
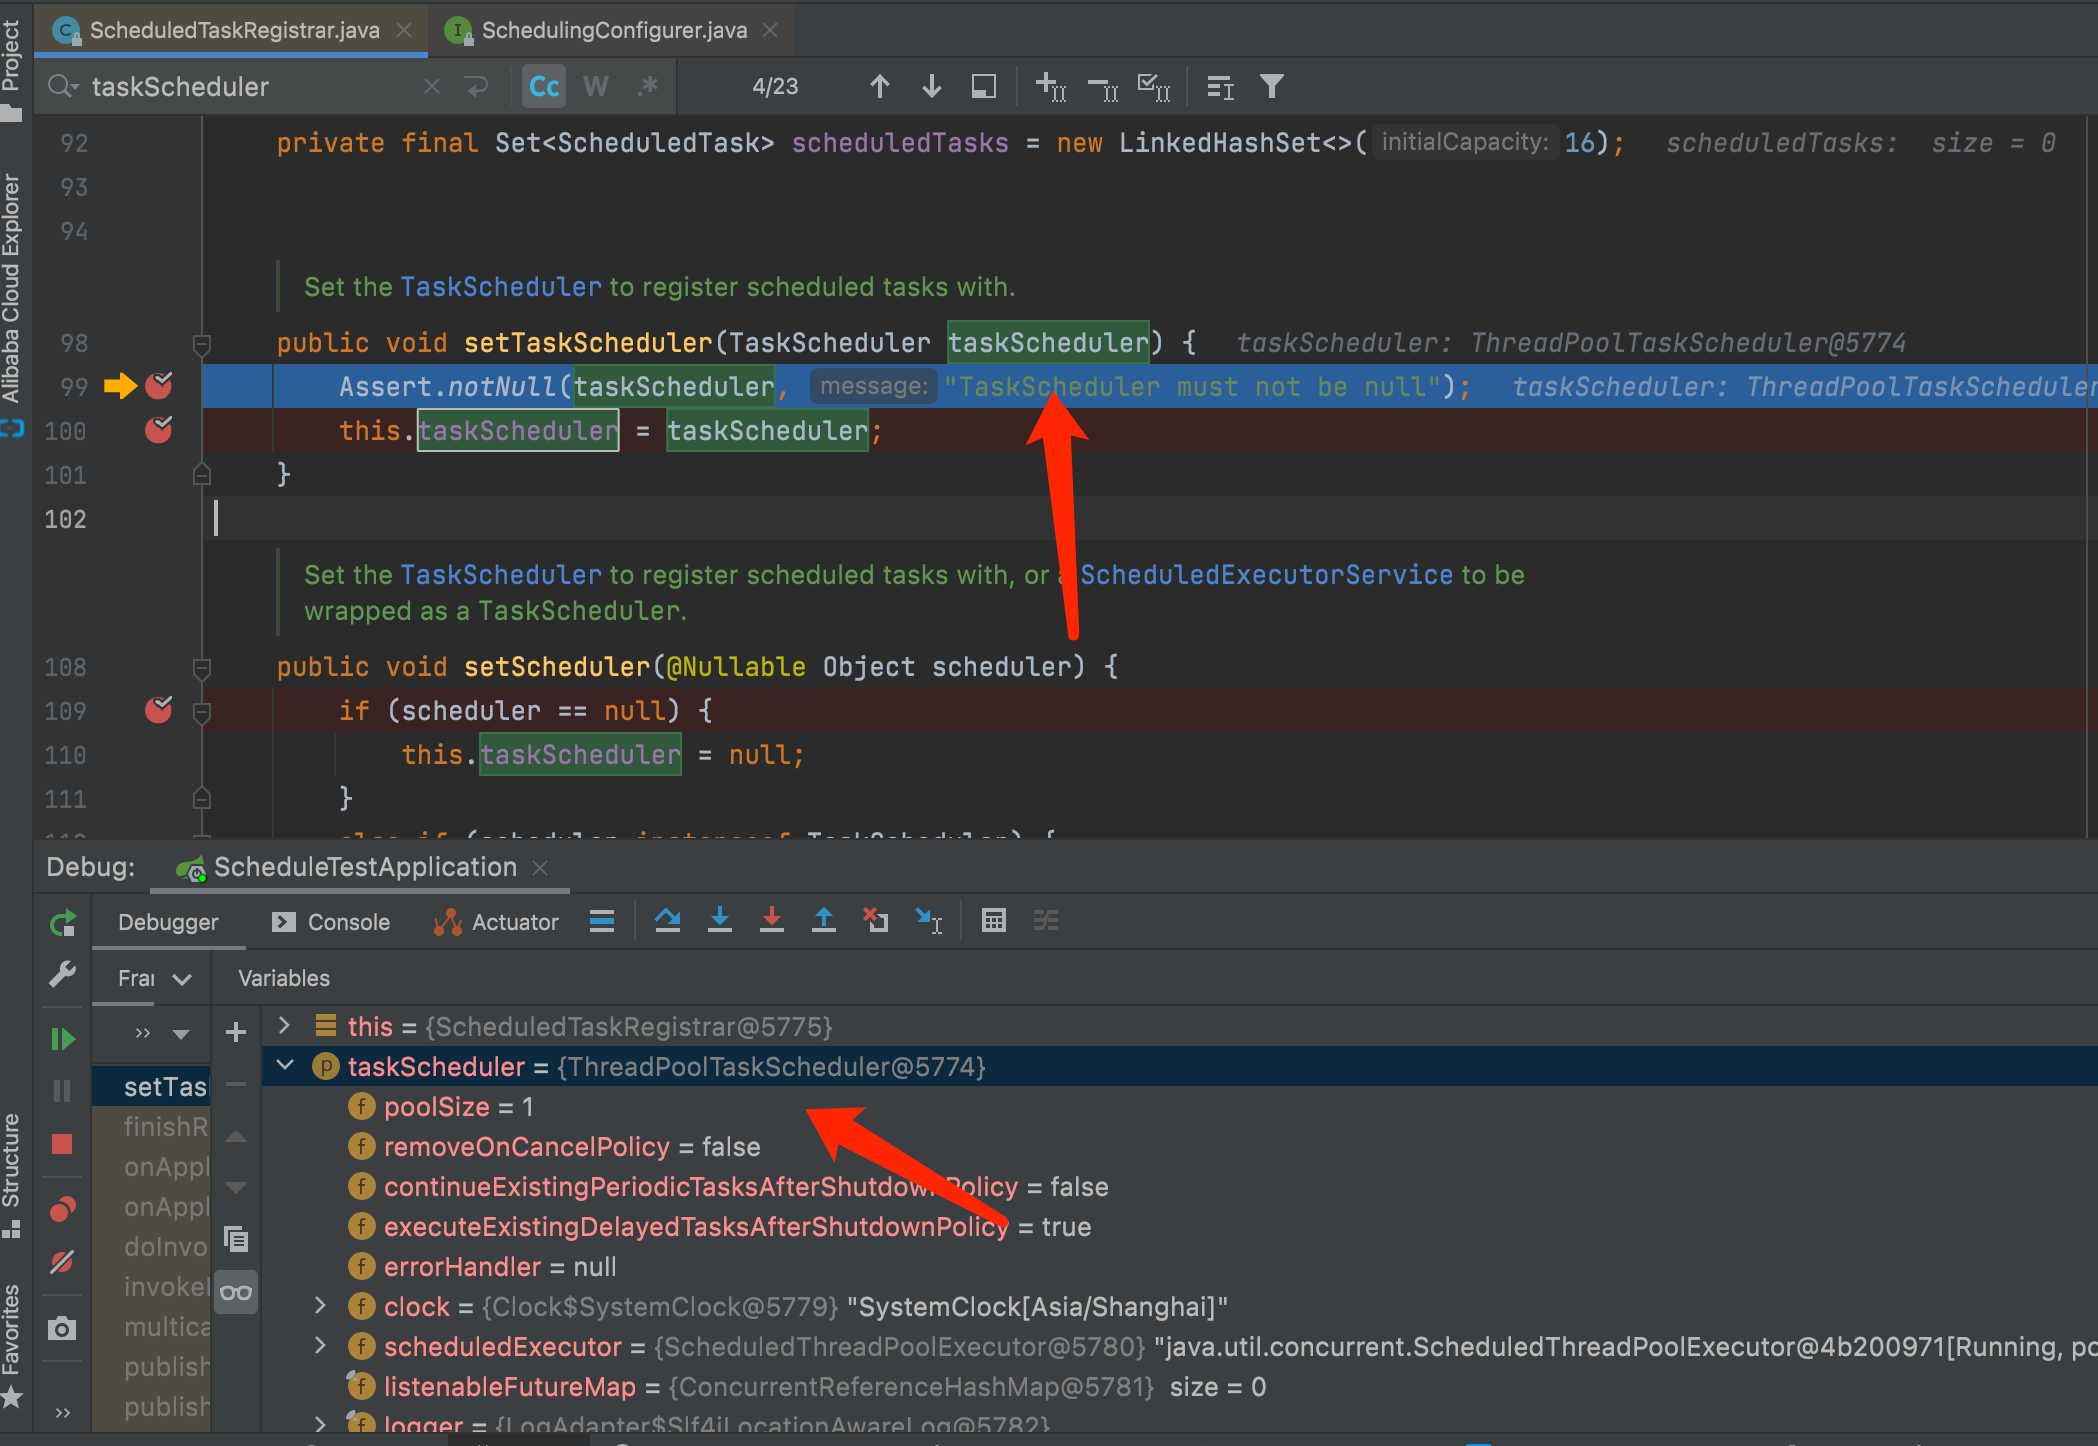
Spring Boot Schedule疑问及线程池配置 问题:在默认情况下,存在多个Cron时会出现Cron串行执行。如果某个Cron耗时较长,这会导致其他Cron会无法按期执行。默认情况下为什么会串行执行?我们先从ScheduledTaskRegistrar入手,我们打个断点;在未自定义线程池情况下,系统默认给的:taskScheduler为ThreadPoolTaskSchedulerpublic class ScheduledTaskRegistrar implements ScheduledTaskHolder, InitializingBean, DisposableBean { ... public void setTaskScheduler(TaskScheduler taskScheduler) { Assert.notNull(taskScheduler, "TaskScheduler must not be null"); this.taskScheduler = taskScheduler; } ... } 我们可以看到,默认的Scheduling线程只有1个。在ThreadPoolTaskScheduler中:public class ThreadPoolTaskScheduler extends ExecutorConfigurationSupport implements AsyncListenableTaskExecutor, SchedulingTaskExecutor, TaskScheduler { ... /** * 默认poolSize为1 */ private volatile int poolSize = 1; ... @Override protected ExecutorService initializeExecutor( ThreadFactory threadFactory, RejectedExecutionHandler rejectedExecutionHandler) { this.scheduledExecutor = createExecutor(this.poolSize, threadFactory, rejectedExecutionHandler); if (this.scheduledExecutor instanceof ScheduledThreadPoolExecutor) { ScheduledThreadPoolExecutor scheduledPoolExecutor = (ScheduledThreadPoolExecutor) this.scheduledExecutor; if (this.removeOnCancelPolicy) { scheduledPoolExecutor.setRemoveOnCancelPolicy(true); } if (this.continueExistingPeriodicTasksAfterShutdownPolicy) { scheduledPoolExecutor.setContinueExistingPeriodicTasksAfterShutdownPolicy(true); } if (!this.executeExistingDelayedTasksAfterShutdownPolicy) { scheduledPoolExecutor.setExecuteExistingDelayedTasksAfterShutdownPolicy(false); } } return this.scheduledExecutor; } ... }验证cron、cron-2执行前先输出当前时间、线程名称,最后再睡眠5秒;整分时运行;cronimport org.slf4j.Logger; import org.slf4j.LoggerFactory; import org.springframework.scheduling.annotation.EnableScheduling; import org.springframework.scheduling.annotation.Scheduled; import org.springframework.stereotype.Component; import java.text.SimpleDateFormat; import java.time.Instant; import java.util.Date; @Component @EnableScheduling public class Cron { private Logger logger = LoggerFactory.getLogger(getClass()); @Scheduled(cron = "0 * * * * *") public void doCron() { printTime(); try { Thread.sleep(5000); } catch (Exception e) { } } private void printTime() { String pattern = "yyyy-MM-dd HH:mm:ss"; String now = new SimpleDateFormat(pattern).format(Date.from(Instant.now())); logger.info("now:{}, threadName:{}", now, Thread.currentThread().getName()); } } cron-2import org.slf4j.Logger; import org.slf4j.LoggerFactory; import org.springframework.scheduling.annotation.EnableScheduling; import org.springframework.scheduling.annotation.Scheduled; import org.springframework.stereotype.Component; import java.text.SimpleDateFormat; import java.time.Instant; import java.util.Date; @Component @EnableScheduling public class Cron2 { private Logger logger = LoggerFactory.getLogger(getClass()); @Scheduled(cron = "0 * * * * *") public void doCron() { printTime(); try { Thread.sleep(5000); } catch (Exception e) { } } private void printTime() { String pattern = "yyyy-MM-dd HH:mm:ss"; String now = new SimpleDateFormat(pattern).format(Date.from(Instant.now())); logger.info("now:{}, threadName:{}", now, Thread.currentThread().getName()); } } 输出2022-04-07 17:34:00.004 INFO 28241 --- [ scheduling-1] com.cc.cron.Cron : now:2022-04-07 17:34:00, threadName:scheduling-1 2022-04-07 17:34:05.009 INFO 28241 --- [ scheduling-1] com.cc.cron.Cron2 : now:2022-04-07 17:34:05, threadName:scheduling-1总结我们可以看到:cron、cron2先后由同一个线程[scheduling-1]执行,并间隔5秒。解决首先想到可以使用线程池,让多个Cron并行处理。import org.springframework.context.annotation.Bean; import org.springframework.context.annotation.Configuration; import org.springframework.scheduling.annotation.SchedulingConfigurer; import org.springframework.scheduling.concurrent.ThreadPoolTaskScheduler; import org.springframework.scheduling.config.ScheduledTaskRegistrar; import java.util.concurrent.Executor; @Configuration public class ScheduleConfig implements SchedulingConfigurer { @Override public void configureTasks(ScheduledTaskRegistrar taskRegistrar) { taskRegistrar.setScheduler(executor()); } @Bean public Executor executor() { ThreadPoolTaskScheduler executor = new ThreadPoolTaskScheduler(); // 配置处理器线程数 int availableProcessors = Runtime.getRuntime().availableProcessors(); executor.setPoolSize(availableProcessors); executor.setThreadNamePrefix("scheduling-pool-"); executor.setWaitForTasksToCompleteOnShutdown(true); executor.setAwaitTerminationSeconds(60); return executor; } } 验证2022-04-07 17:41:00.001 INFO 30052 --- [sheduling-pool-2] com.cc.cron.Cron2 : now:2022-04-07 17:41:00, threadName:scheduling-pool-2 2022-04-07 17:41:00.001 INFO 30052 --- [sheduling-pool-1] com.cc.cron.Cron : now:2022-04-07 17:41:00, threadName:scheduling-pool-1在配置线程池后:同时输出两条日志且由不同线程执行:[sheduling-pool-2]、[sheduling-pool-1],没有了5秒的间隔。疑问在配置了线程池后,在同一个Cron中是否出现上次未执行完又开始下一次?在某些场景下这是无法接受的。我们看个例子 import org.slf4j.Logger; import org.slf4j.LoggerFactory; import org.springframework.scheduling.annotation.EnableScheduling; import org.springframework.scheduling.annotation.Scheduled; import org.springframework.stereotype.Component; import java.sql.Date; import java.text.SimpleDateFormat; import java.time.Instant; @Component @EnableScheduling public class CronTest { private Logger logger = LoggerFactory.getLogger(getClass()); /** * 2秒执行一次,每次睡眠10秒 */ @Scheduled(fixedRate = 2000) public void doCron() { printTime(); try { Thread.sleep(10000); } catch (Exception e) {} } private void printTime() { String pattern = "yyyy-MM-dd HH:mm:ss"; String now = new SimpleDateFormat(pattern).format(Date.from(Instant.now())); logger.info("now:{}, threadName:{}", now, Thread.currentThread().getName()); } }输出:now:2022-04-07 17:22:22, threadName:scheduling-pool-1 now:2022-04-07 17:22:32, threadName:scheduling-pool-2 now:2022-04-07 17:22:42, threadName:scheduling-pool-1 now:2022-04-07 17:22:52, threadName:scheduling-pool-3 now:2022-04-07 17:23:02, threadName:scheduling-pool-2结论我们可以看到,在配置线程池情况下:单个cron仍是串行执行。如果想并行执行,应该如何处理?@Scheduled can be used as a repeatable annotation. If several scheduled declarations are found on the same method, each of them will be processed independently, with a separate trigger firing for each of them. As a consequence, such co-located schedules may overlap and execute multiple times in parallel or in immediate succession. Please make sure that your specified cron expressions etc do not accidentally overlap.Example: @Scheduled(cron = "0/5 * * * * ?") @Scheduled(cron = "0/1 * * * * ?") public void test() { // do something }