搜索到
19
篇与
cc
的结果
-
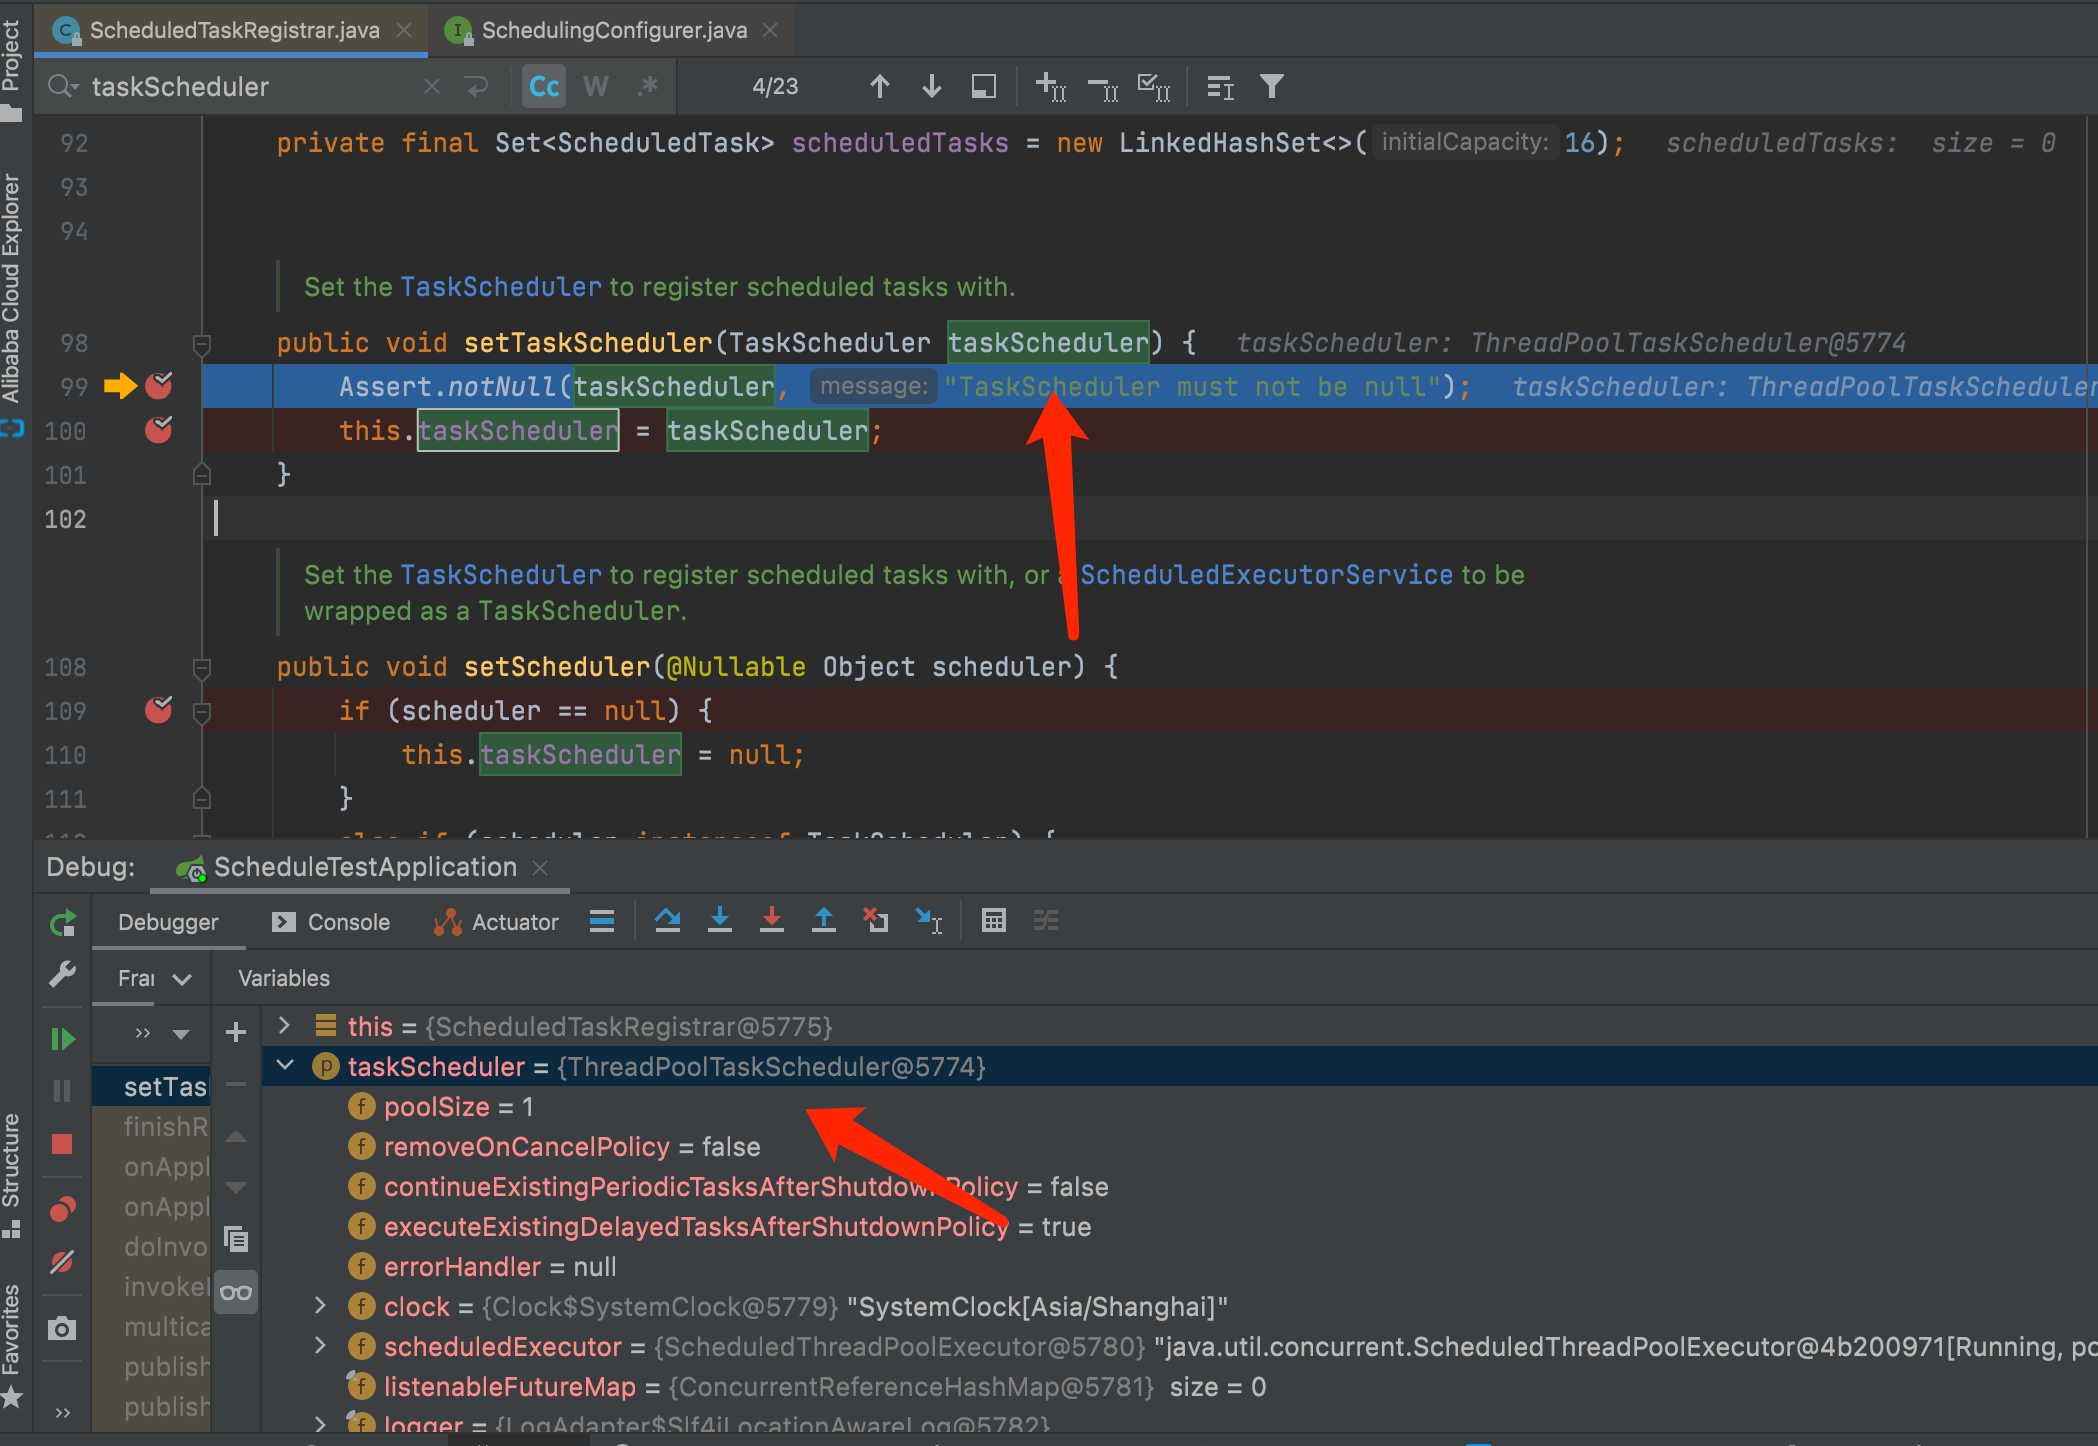
 Spring Boot Schedule疑问及线程池配置 问题:在默认情况下,存在多个Cron时会出现Cron串行执行。如果某个Cron耗时较长,这会导致其他Cron会无法按期执行。默认情况下为什么会串行执行?我们先从ScheduledTaskRegistrar入手,我们打个断点;在未自定义线程池情况下,系统默认给的:taskScheduler为ThreadPoolTaskSchedulerpublic class ScheduledTaskRegistrar implements ScheduledTaskHolder, InitializingBean, DisposableBean { ... public void setTaskScheduler(TaskScheduler taskScheduler) { Assert.notNull(taskScheduler, "TaskScheduler must not be null"); this.taskScheduler = taskScheduler; } ... } 我们可以看到,默认的Scheduling线程只有1个。在ThreadPoolTaskScheduler中:public class ThreadPoolTaskScheduler extends ExecutorConfigurationSupport implements AsyncListenableTaskExecutor, SchedulingTaskExecutor, TaskScheduler { ... /** * 默认poolSize为1 */ private volatile int poolSize = 1; ... @Override protected ExecutorService initializeExecutor( ThreadFactory threadFactory, RejectedExecutionHandler rejectedExecutionHandler) { this.scheduledExecutor = createExecutor(this.poolSize, threadFactory, rejectedExecutionHandler); if (this.scheduledExecutor instanceof ScheduledThreadPoolExecutor) { ScheduledThreadPoolExecutor scheduledPoolExecutor = (ScheduledThreadPoolExecutor) this.scheduledExecutor; if (this.removeOnCancelPolicy) { scheduledPoolExecutor.setRemoveOnCancelPolicy(true); } if (this.continueExistingPeriodicTasksAfterShutdownPolicy) { scheduledPoolExecutor.setContinueExistingPeriodicTasksAfterShutdownPolicy(true); } if (!this.executeExistingDelayedTasksAfterShutdownPolicy) { scheduledPoolExecutor.setExecuteExistingDelayedTasksAfterShutdownPolicy(false); } } return this.scheduledExecutor; } ... }验证cron、cron-2执行前先输出当前时间、线程名称,最后再睡眠5秒;整分时运行;cronimport org.slf4j.Logger; import org.slf4j.LoggerFactory; import org.springframework.scheduling.annotation.EnableScheduling; import org.springframework.scheduling.annotation.Scheduled; import org.springframework.stereotype.Component; import java.text.SimpleDateFormat; import java.time.Instant; import java.util.Date; @Component @EnableScheduling public class Cron { private Logger logger = LoggerFactory.getLogger(getClass()); @Scheduled(cron = "0 * * * * *") public void doCron() { printTime(); try { Thread.sleep(5000); } catch (Exception e) { } } private void printTime() { String pattern = "yyyy-MM-dd HH:mm:ss"; String now = new SimpleDateFormat(pattern).format(Date.from(Instant.now())); logger.info("now:{}, threadName:{}", now, Thread.currentThread().getName()); } } cron-2import org.slf4j.Logger; import org.slf4j.LoggerFactory; import org.springframework.scheduling.annotation.EnableScheduling; import org.springframework.scheduling.annotation.Scheduled; import org.springframework.stereotype.Component; import java.text.SimpleDateFormat; import java.time.Instant; import java.util.Date; @Component @EnableScheduling public class Cron2 { private Logger logger = LoggerFactory.getLogger(getClass()); @Scheduled(cron = "0 * * * * *") public void doCron() { printTime(); try { Thread.sleep(5000); } catch (Exception e) { } } private void printTime() { String pattern = "yyyy-MM-dd HH:mm:ss"; String now = new SimpleDateFormat(pattern).format(Date.from(Instant.now())); logger.info("now:{}, threadName:{}", now, Thread.currentThread().getName()); } } 输出2022-04-07 17:34:00.004 INFO 28241 --- [ scheduling-1] com.cc.cron.Cron : now:2022-04-07 17:34:00, threadName:scheduling-1 2022-04-07 17:34:05.009 INFO 28241 --- [ scheduling-1] com.cc.cron.Cron2 : now:2022-04-07 17:34:05, threadName:scheduling-1总结我们可以看到:cron、cron2先后由同一个线程[scheduling-1]执行,并间隔5秒。解决首先想到可以使用线程池,让多个Cron并行处理。import org.springframework.context.annotation.Bean; import org.springframework.context.annotation.Configuration; import org.springframework.scheduling.annotation.SchedulingConfigurer; import org.springframework.scheduling.concurrent.ThreadPoolTaskScheduler; import org.springframework.scheduling.config.ScheduledTaskRegistrar; import java.util.concurrent.Executor; @Configuration public class ScheduleConfig implements SchedulingConfigurer { @Override public void configureTasks(ScheduledTaskRegistrar taskRegistrar) { taskRegistrar.setScheduler(executor()); } @Bean public Executor executor() { ThreadPoolTaskScheduler executor = new ThreadPoolTaskScheduler(); // 配置处理器线程数 int availableProcessors = Runtime.getRuntime().availableProcessors(); executor.setPoolSize(availableProcessors); executor.setThreadNamePrefix("scheduling-pool-"); executor.setWaitForTasksToCompleteOnShutdown(true); executor.setAwaitTerminationSeconds(60); return executor; } } 验证2022-04-07 17:41:00.001 INFO 30052 --- [sheduling-pool-2] com.cc.cron.Cron2 : now:2022-04-07 17:41:00, threadName:scheduling-pool-2 2022-04-07 17:41:00.001 INFO 30052 --- [sheduling-pool-1] com.cc.cron.Cron : now:2022-04-07 17:41:00, threadName:scheduling-pool-1在配置线程池后:同时输出两条日志且由不同线程执行:[sheduling-pool-2]、[sheduling-pool-1],没有了5秒的间隔。疑问在配置了线程池后,在同一个Cron中是否出现上次未执行完又开始下一次?在某些场景下这是无法接受的。我们看个例子 import org.slf4j.Logger; import org.slf4j.LoggerFactory; import org.springframework.scheduling.annotation.EnableScheduling; import org.springframework.scheduling.annotation.Scheduled; import org.springframework.stereotype.Component; import java.sql.Date; import java.text.SimpleDateFormat; import java.time.Instant; @Component @EnableScheduling public class CronTest { private Logger logger = LoggerFactory.getLogger(getClass()); /** * 2秒执行一次,每次睡眠10秒 */ @Scheduled(fixedRate = 2000) public void doCron() { printTime(); try { Thread.sleep(10000); } catch (Exception e) {} } private void printTime() { String pattern = "yyyy-MM-dd HH:mm:ss"; String now = new SimpleDateFormat(pattern).format(Date.from(Instant.now())); logger.info("now:{}, threadName:{}", now, Thread.currentThread().getName()); } }输出:now:2022-04-07 17:22:22, threadName:scheduling-pool-1 now:2022-04-07 17:22:32, threadName:scheduling-pool-2 now:2022-04-07 17:22:42, threadName:scheduling-pool-1 now:2022-04-07 17:22:52, threadName:scheduling-pool-3 now:2022-04-07 17:23:02, threadName:scheduling-pool-2结论我们可以看到,在配置线程池情况下:单个cron仍是串行执行。如果想并行执行,应该如何处理?@Scheduled can be used as a repeatable annotation. If several scheduled declarations are found on the same method, each of them will be processed independently, with a separate trigger firing for each of them. As a consequence, such co-located schedules may overlap and execute multiple times in parallel or in immediate succession. Please make sure that your specified cron expressions etc do not accidentally overlap.Example: @Scheduled(cron = "0/5 * * * * ?") @Scheduled(cron = "0/1 * * * * ?") public void test() { // do something }
 -
Centos 部署 Typecho 安装docker// 添加docker-ce repo yum-config-manager --add-repo https://download.docker.com/linux/centos/docker-ce.repo // 安装 & 启动docker yum install -y docker-ce systemctl start docker docker version systemctl enable docker 安装Mysqldocker run --restart always -d --name typechobmysql -v /root/data/mysql:/var/lib/mysql -e "MYSQL_ROOT_PASSWORD=root" -p 3306:3306 mysql:5.7初始化数据库// enter mysql container docker exec -it typechobmysql /bin/bash // log in mysql -u root -p // create database CREATE DATABASE `typecho` CHARACTER SET utf8 COLLATE utf8_general_ci; // exit ctrl+p+q安装 Typecho// data 目录为typecho数据目录 docker run -d --name=typecho-blog --restart always --mount type=tmpfs,destination=/tmp -v /root/data/typecho:/data -e PHP_TZ=Asia/Shanghai -e PHP_MAX_EXECUTION_TIME=600 -p 80:80 80x86/typecho:latest 配置Typecho数据库选择mysqlifconfig获取服务器本地ip设置数据库名称:typecho
-
Centos 配置免密登录+root 权限 Centos 配置免密登录创建用户adduser cc //设置密码 passwd cc切换用户,配置公钥su cc //切换用户 cd ~ //到用户根目录 mkdir .ssh //创建ssh目录 chmod 700 .ssh //修改.ssh目录权限 cd .ssh //进入 .ssh目录 vim authorized_keys //创建并写入公钥 chmod 400 authorized_keys //修改已授权公钥文件权限配置免密chmod -v u+w /etc/sudoers (增加 sudoers 文件的写的权限,默认为只读) vim /etc/sudoers //新增用户 cc ALL=(ALL) ALL (添加这一行) //如果要免密码 cc ALL=(ALL) NOPASSWD:ALL chmod -v u-w /etc/sudoers (删除 sudoers 的写的权限)本机配置vim ~/.ssh/config // 添加 Host name HostName ip Port 22 User cc IdentityFile ~/.ssh/id_rsa
-